Camera Software Development Solution
This document describes the NVIDIA® Jetson™ TX2 camera software solution and explains the NVIDIA supported and recommended camera software architecture for fast and optimal time to market. Development options are outlined and explained to customize the camera solution for USB, YUV, and Bayer camera support. Additionally, debugging approaches are explored to aid in the development process.
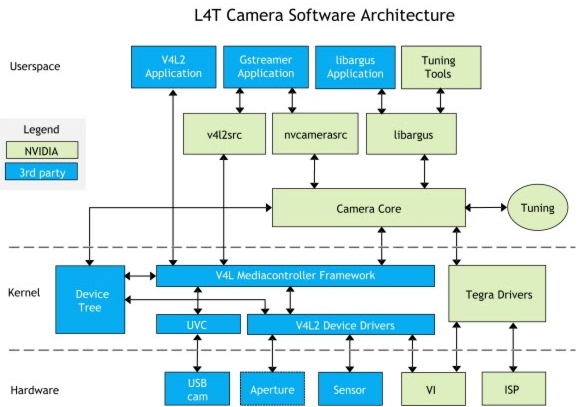
Camera Architecture Stack
The NVIDIA camera software architecture includes NVIDIA components that allow for ease of development and customization:
The camera architecture includes the following NVIDIA components:
•libargus—Provides a low-level API based on the camera core stack.
•nvcamerasrc—An NVIDIA camera GStreamer plugin that provides many options to control ISP properties.
•v4l2src—A standard Linux V4L2 application that uses direct kernel IOCTL calls to access V4L2 functionality.
NVIDIA provides OV5693 Bayer sensor as a sample. NVIDIA tunes this sensor for the Jetson platform. The drive code, based on the media controller framework, is available at:
./kernel/drivers/media/i2c/ov5693.c
NVIDIA provides additional sensor support for BSP software releases. Developers must work with NVIDIA certified camera partners for any Bayer sensor and tuning support. The work involved includes:
•Sensor driver development
•Custom tools for sensor characterization
•Image quality tuning
These tools and operating mechanisms are NOT part of the public Jetson Embedded Platform (JEP) Board Support Package release.
For more information on sensor driver development, see the NVIDIA Tegra X1 V4L2 Sensor Driver Programming Guide.
Camera API Matrix
The following table provides a matrix of the camera APIs available at each camera configuration.
| | | |
| Uses Tegra ISP (CSI Interface) | Does not use Tegra ISP (CSI Interface) | USB (UVC) * (USB Interface) |
Camera API | libargus GStreamer (GST-NVCamera) | V4L2 | V4L2 |
* Customer can support peripheral bus device such as:
Ethernet
Non-UVC USB |
Note: | The default OV5693 camera does not contain an integrated ISP. Use of the V4L2 API with the reference camera records “raw” Bayer data. |
Approaches for Validating and Testing the V4L2 Driver
This topic provides various testing and debugging approaches to assist development and validation of the sensor functionality.
Once your driver development is complete, use the provided tools or application to validate and test the V4L2 driver interface.
For general GStreamer and multimedia operations, see the Multimedia User Guide, which is available from the NVIDIA Embedded Download Center at:
Applications Using libargus Low-level APIs
The NVIDIA Multimedia API provides samples that demonstrate how to use the libargus APIs to preview, capture, and record the sensor stream.
The Multimedia API can be installed only with NVIDIA JetPack. It cannot be installed as a stand-alone package. JetPack is available for download from the NVIDIA Embedded Download Center at:
To view the Multimedia API Reference, click the API tab at the top of this page.
Applications Using GStreamer with the nvcamerasrc Plugin
With GStreamer with the nvcamerasrc, you can:
•Enable ISP post-processing for Bayer sensors
•Perform format conversion
•Generate output directly for YUV sensor and USB camera
For example, for a Bayer sensor with the format 1080p/30/BGGR, you can:
•Save the preview into the file as follows:
gst-launch-1.0 nvcamerasrc num-buffers=200 sensor-id=0 ! 'video/x-raw(memory:NVMM),width=1920, height=1080, framerate=30/1, format=NV12' ! omxh264enc ! qtmux ! filesink location=test.mp4 -ev
•Render the preview to an HDMI screen as follows:
gst-launch-1.0 nvcamerasrc sensor-id=0 ! 'video/x-raw(memory:NVMM),width=1920, height=1080, framerate=30/1, format=NV12' ! nvoverlaysink -ev
Applications Using GStreamer with V4L2 Source Plugin
Use this approach for YUV sensor or USB camera to output YUV images without ISP post-processing. This approach does not use any of the NVIDIA camera software stack.
For example, a USB camera with the format 480p/30/YUY2, you can:
•Save the preview into a file as follows (based on software converter):
gst-launch-1.0 v4l2src num-buffers=200 device=/dev/video0 ! 'video/x-raw, format=YUY2, width=640, height=480, framerate=30/1' ! videoconvert ! omxh264enc ! qtmux ! filesink location=test.mp4 -ev
•Render the preview to a screen as follows:
//export DISPLAY=:0 if you are operating from remote console
gst-launch-1.0 v4l2src device=/dev/video0 ! 'video/x-raw, format=YUY2, width=640, height=480, framerate=30/1' ! xvimagesink -ev
For a YUV sensor with the format 480p/30/UYVY, you can:
•Save the preview into a file as follows (based on hardware accelerated converter):
gst-launch-1.0 -v v4l2src device=/dev/video0 ! 'video/x-raw, format=(string)UYVY, width=(int)640, height=(int)480, framerate=(fraction)30/1' ! nvvidconv ! 'video/x-raw(memory:NVMM), format=(string)NV12' ! omxh264enc ! qtmux ! filesink location=test.mp4 -ev
•Render the preview to a screen as follows:
//export DISPLAY=:0 if you are operating from remote console
gst-launch-1.0 v4l2src device=/dev/video0 ! 'video/x-raw, format=(string)UYVY, width=(int)640, height=(int)480, framerate=(fraction)30/1' ! xvimagesink -ev
Applications Using V4L2 IOCTL Directly
Use this approach to verify basic functionality during sensor bringup.
For example, capture from a Bayer sensor with the format 1080p/30/RG10:
v4l2-ctl --set-fmt-video=width=1920,height=1080,pixelformat=RG10 --stream-mmap --stream-count=1 -d /dev/video0 --stream-to=ov5693.raw
ISP Support
To enable ISP support
•Built-in to the Camera Core where the release package includes initial ISP configuration files for reference sensors.
•Place the ISP configuration file into RootFS so that when the system boots, it scans the pre-defined folders to search for the ISP configuration files that match the sensor module. This can be performed at runtime to provide more flexibility.
Note: | CSI cameras, with integrated ISP and USB camera, can work in ISP bypass mode. Provided ISP support is available for Jetson Developer Kit (OV5693) RAW camera module. |